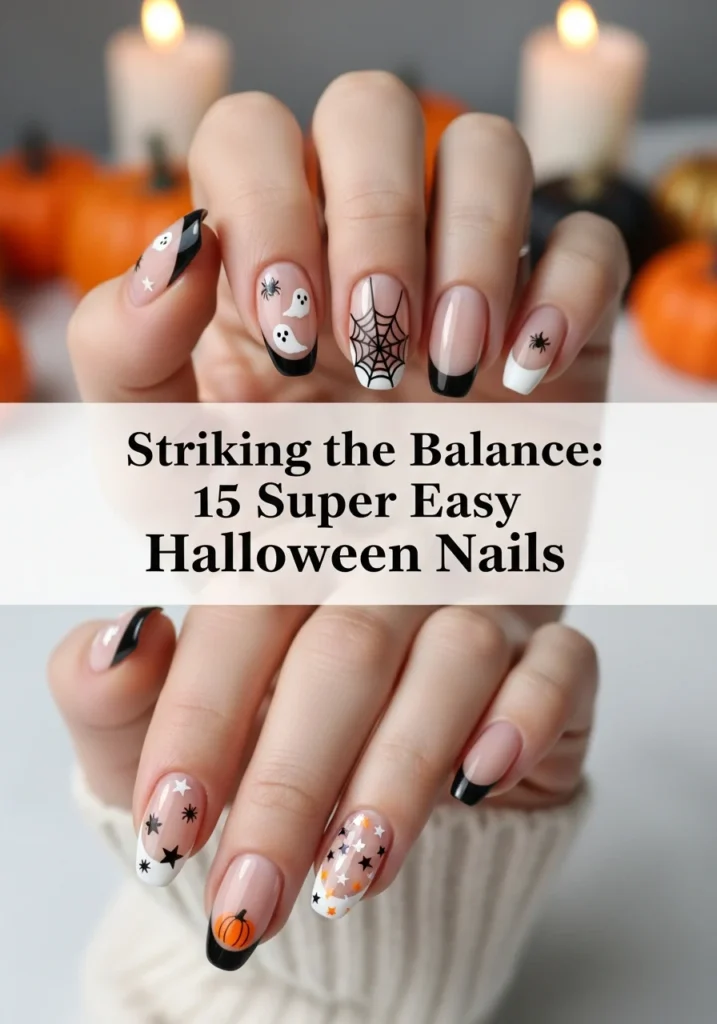
15 Gothic Bat Nails for Halloween Spooky-Chic Nail Style
Halloween is the perfect time to indulge in dark beauty and mysterious elegance, and nothing does that better than gothic bat nail art. These creatures of the night bring a sophisticated touch of edge to your fingers, combining spooky cool with high-fashion glamour. Whether you’re at a Halloween bash, searching for seasonal nail art ideas, or are a fan of the goth look, bat-inspired nails have limitless possibilities. Here in this ultimate guide, we present fifteen breathtaking bat nail designs ranging from subtle and chic to dramatic and bold, along with step-by-step guides on how to get each of them.
Table of Contents
1. Classic Black Silhouette Bats
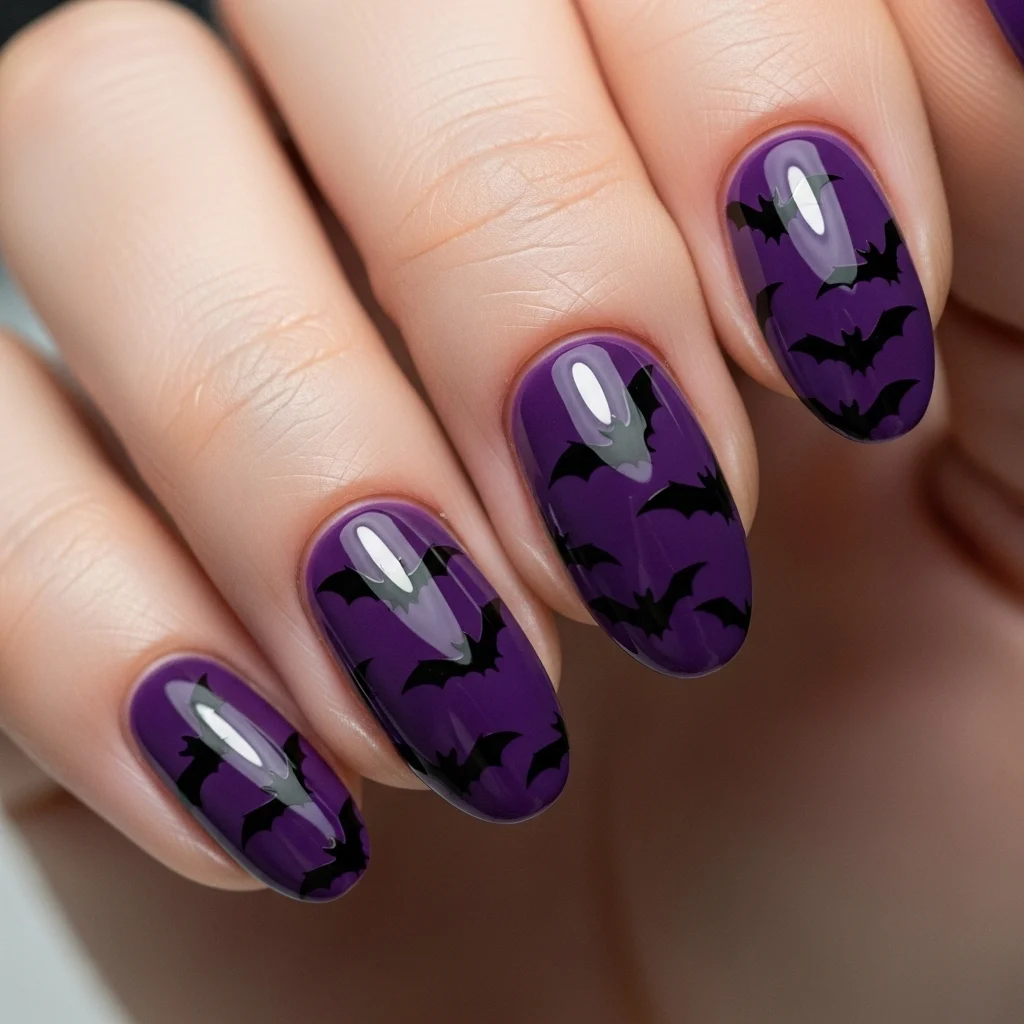
The ageless retro silhouette of black bats against a contrasting color is an instantly iconic Halloween look. Begin with a base coat and proceed with two coats of midnight blue, blood red, or dark purple polish. After that dries, use a fine nail art brush or striping brush and black polish to paint tiny bat silhouettes. Start by making the body of the bat compact and oval in shape, and add triangular wings protruding to both sides. Paint a small circle at the top of the body for the head. Add pointed ears as triangles that are small. Make the flying clusters along your nails by using different sizes and positions of the bats. Finish with a shiny top coat for depth and protection.
2. Matte Black Bats with Glossy Accents
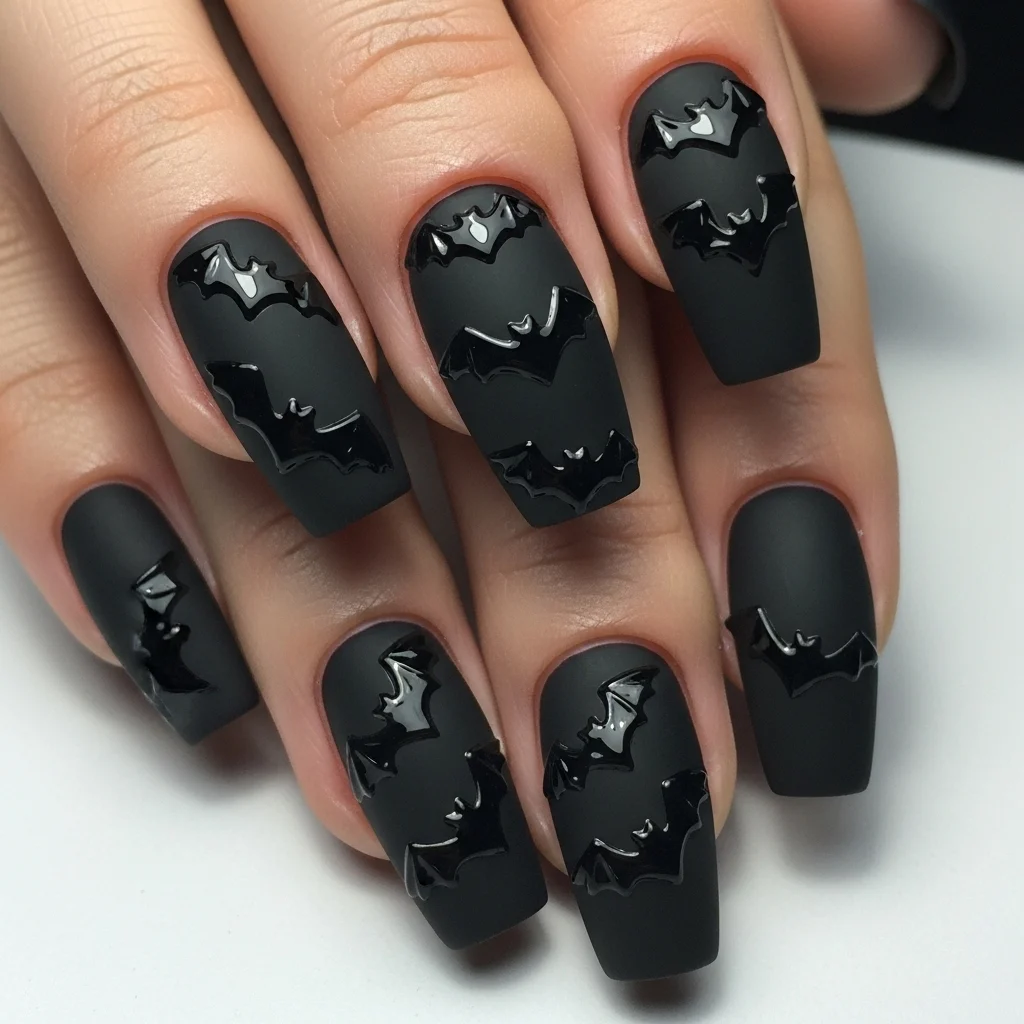
This look employs contrast of texture to produce visual appeal. Apply a matte black base coat to all nails and let it dry completely. With glossy black polish and a detail brush, paint bat silhouettes onto your nails. The glossy bats will reflect light differently from the matte background, giving the impression of sophistication with depth. Or flip this idea on its head by painting shiny black bats over flat purple or red. The trick is to keep lines crisp with texture. Paint slowly and with a fine brush to prevent smudging. Leave the design smudge-free top coat on the flat to keep the texture contrast.
3. Gothic Lace and Bats Combination
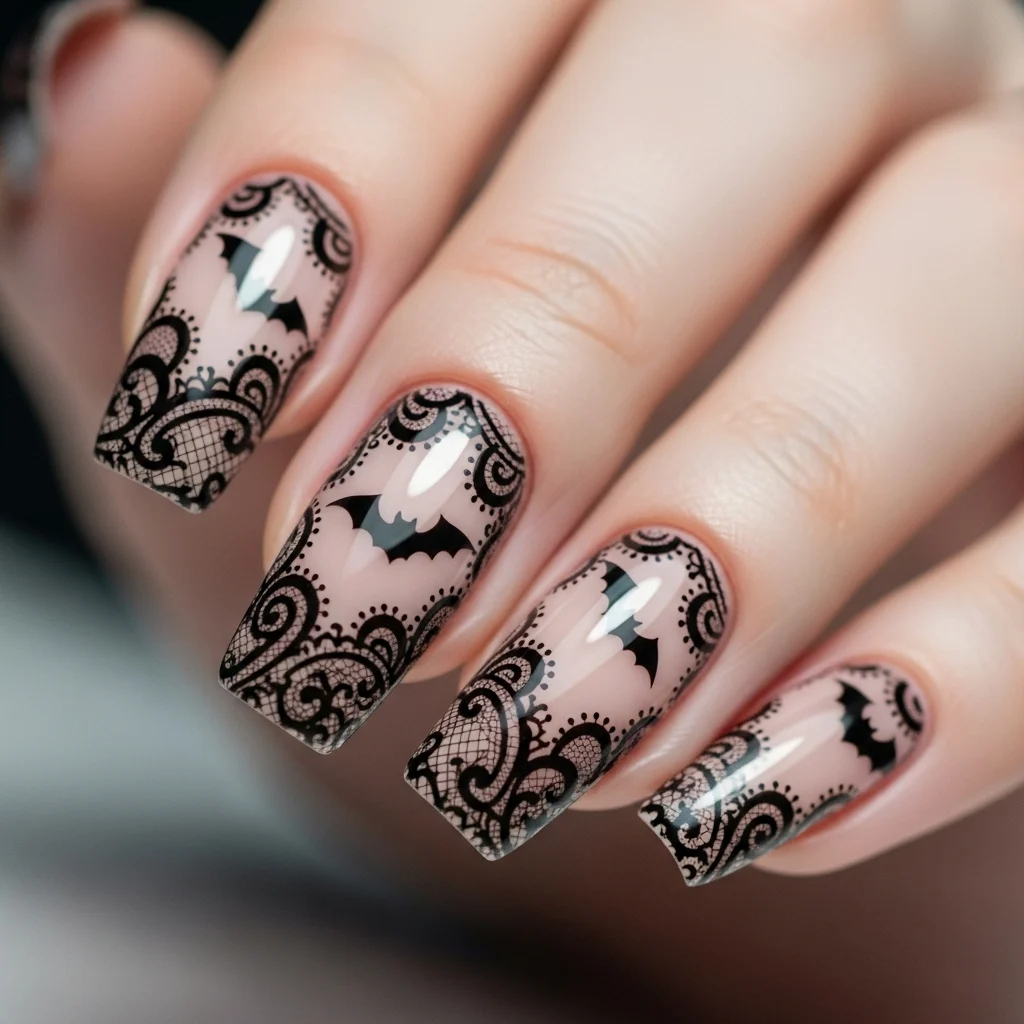
Blend Victorian sophistication with Halloween fantasy by pairing dainty lace accents with bat images. Use a nude, pale gray, or white polish as your background color. After drying, add black lace nail stickers or stamps across the top of the nail, placing a focal on the tips or the center. Paint tiny black bat silhouettes swooping back through the back of the lace pattern with a fine brush tip. The bats will seem to soar through the lace detail. For extra drama, position a single bat onto an accent nail with no lace, simple against the pale color. Seal with a clear top coat to finish all the elements and add shine.
4. Ombre Sunset with Bat Silhouettes
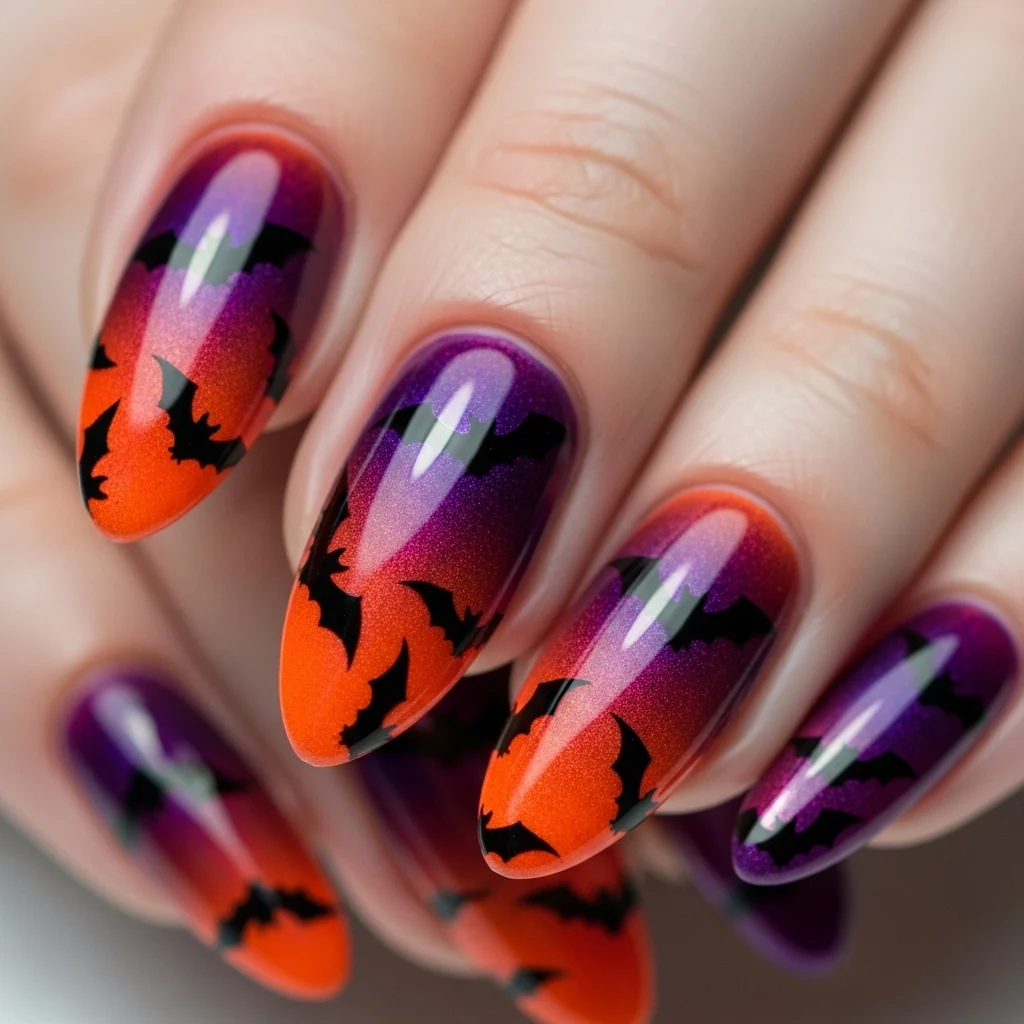
Have a glamorous background for your bats with an amazing ombre effect. Begin with a white or light base coat. Apply orange polish at the tip of the cuticle of every nail using a makeup sponge, grading to deep purple or red at the tips. Blend the color where they meet by carefully bouncing the sponge. Paint black bat silhouettes in mid-flight across the gradient once dry, as if flying through a dusk sky. The bats will be simply stunning against the color shift. Some small bats produce a flock effect that’s really dramatic.
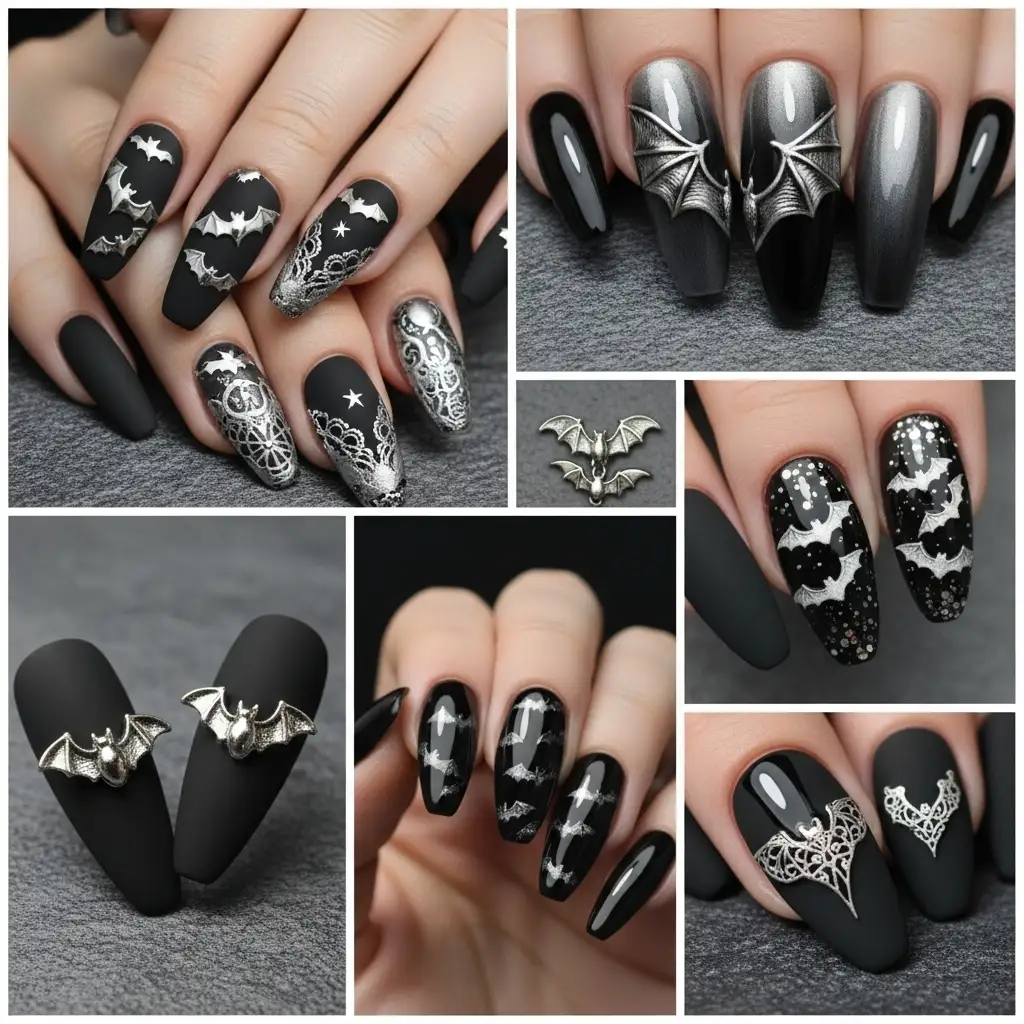
5. 3D Bat Wing Accent Nails

Take bat wing accents three-dimensional. Paint all of the nails dark purple or black as your base. On accent nails (usually the ring fingers), paint raised bat wings with thick black gel polish or acrylic paint. Begin with the cuticle of the body of the bat, and create layers on the wings in light brush strokes, allowing each to dry before adding more depth. The wings should curve over the nail with a textured appearance and mass. Or use pre-made 3D bat wing nail charms and glue them on. Top everything with a heavy top coat, taking care around raised details.
6. Negative Space Bat Designs
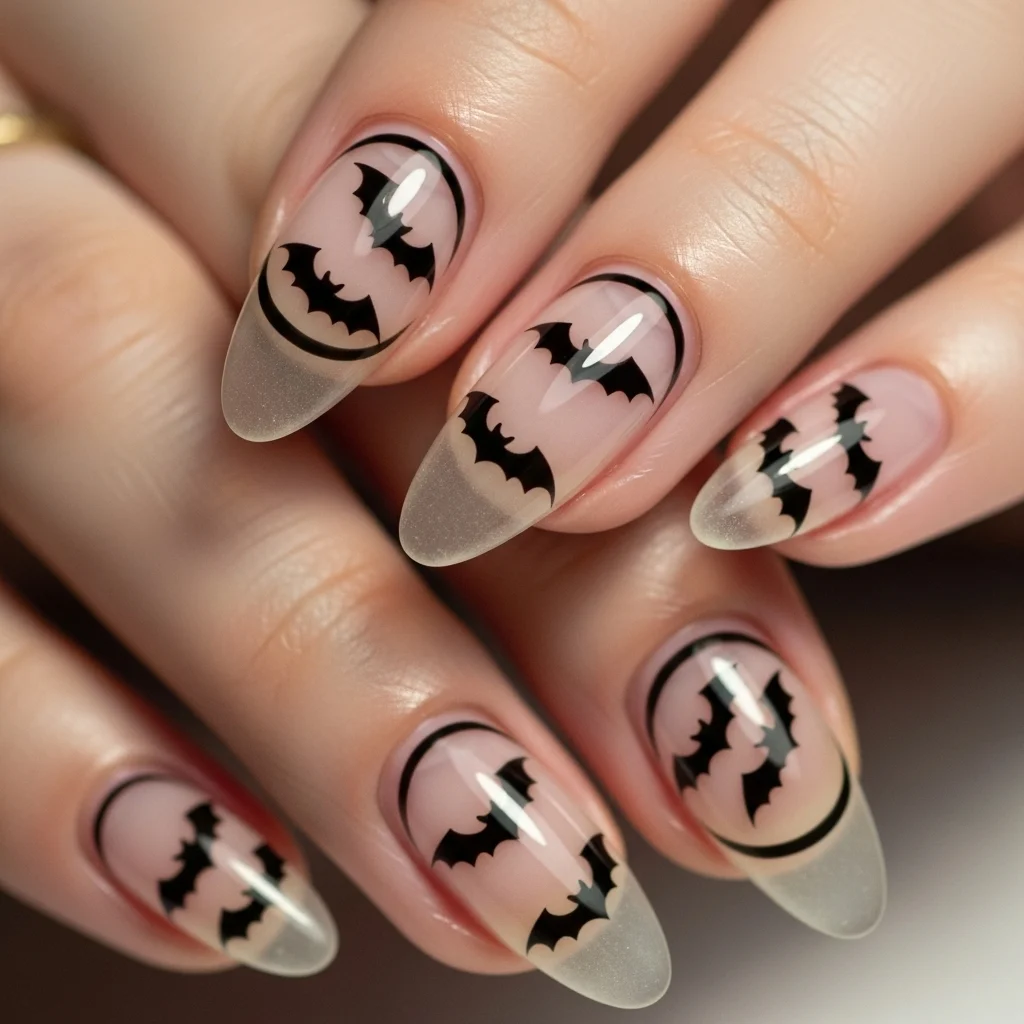
The majority of contemporary negative space trends produce sophisticated bat designs ideal for those who want understated yet sophisticated beauty. Paint a clear base coat over clean, shaped nails. Use black polish and a fine brush to draw bat shapes, not fully filling them up so that the natural nail is visible through the design. You can also reverse the above by coating the entire nail with black polish, then carefully picking up polish in bat shapes with a small acetone-soaked brush before the polish dries. This is a technique that requires patience and finesse. The transparent areas create a visual illusion of an unearthly, ghost-like landscape that is both contemporary and Halloween-themed.
7. Blood Moon and Bats Scene
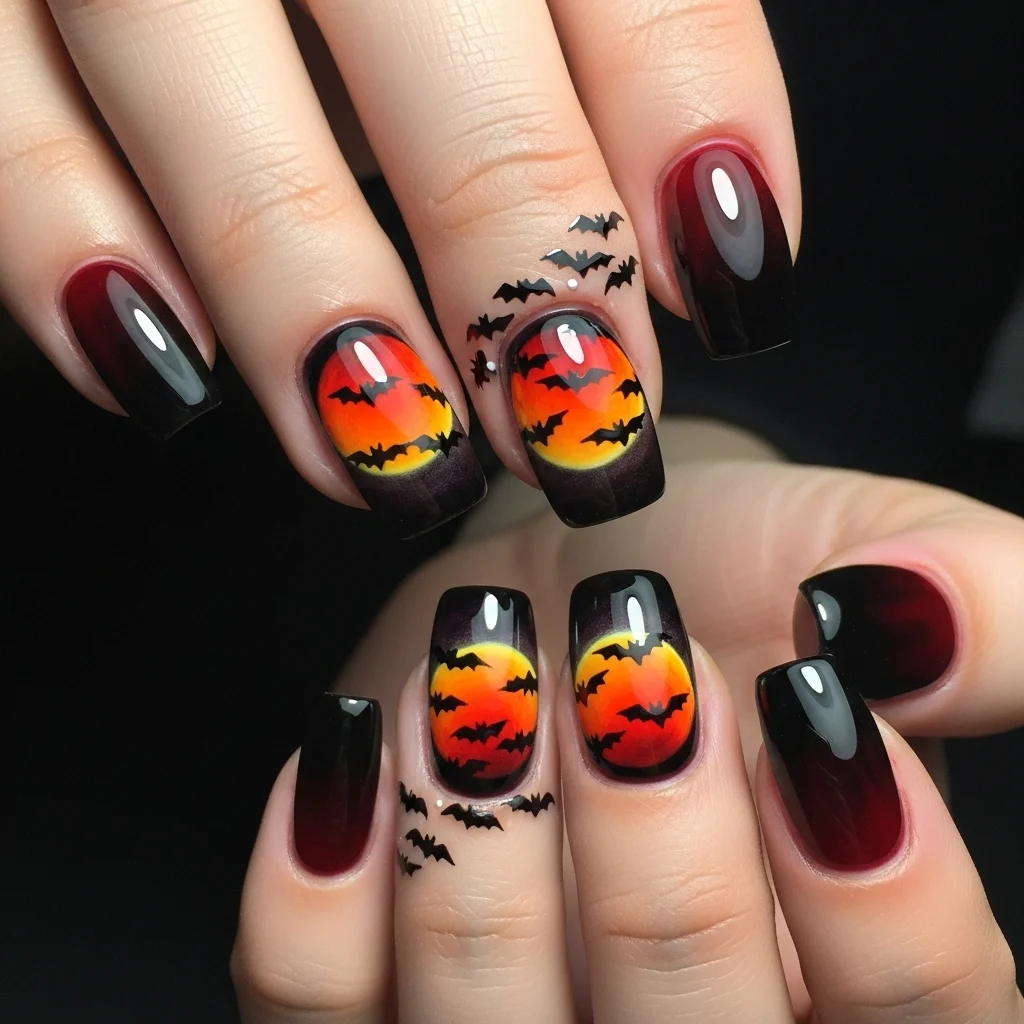
Create a changing Halloween landscape on your nails depicting bats flying against a blood moon. Gradate your nails from a deep red to black from tip to cuticle. On one or two accent nails, apply a large orange or yellow circle with a small brush or dotting tool for a full moon. Allow to dry and then apply silhouettes of bats in black crossing the moon and on other adjacent nails. The bats will be crossing the nighttime sky to the full moon. This narrative style combines cohesive nail art that will be sure to amaze the eye. Cap it off with small stars with a dotting tool and some white polish for added detail.
8. Gothic Cathedral Windows with Bats
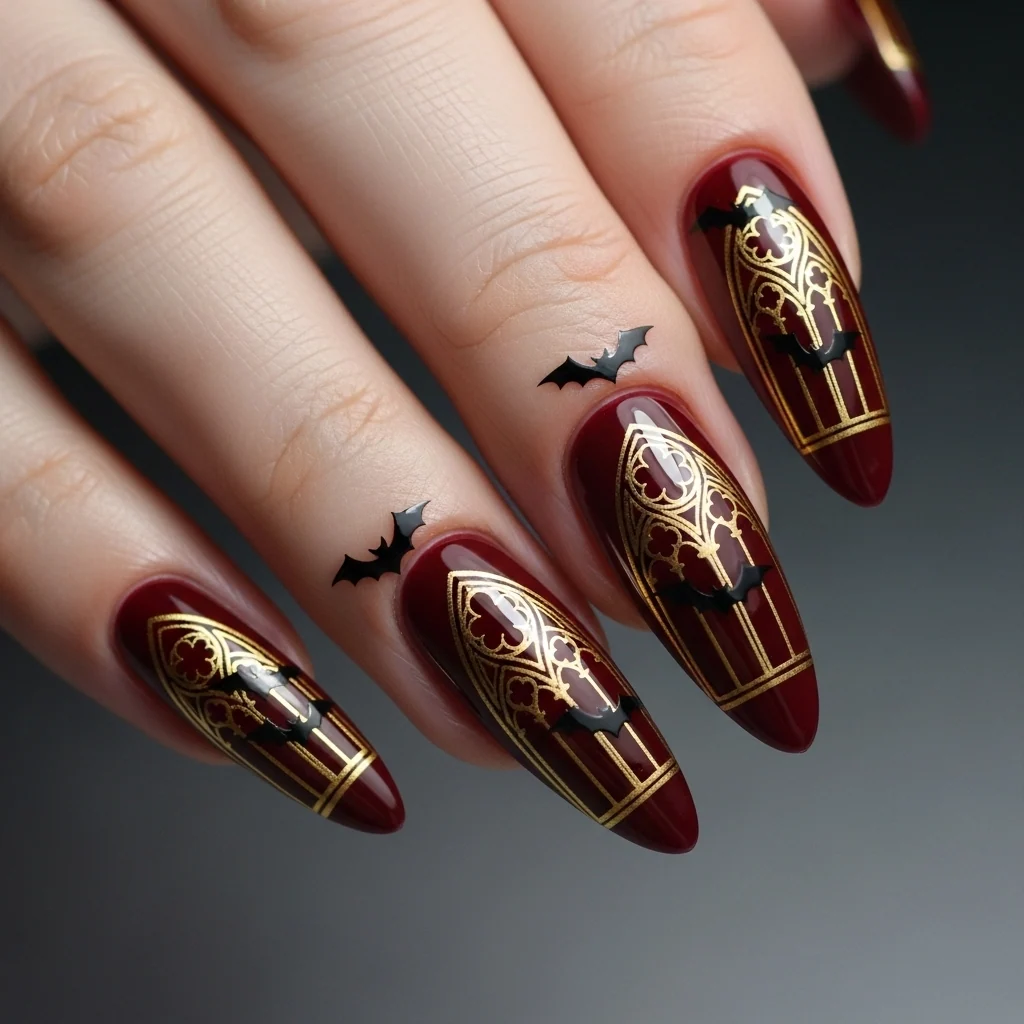
Pair architectural pieces with bat patterns for an epitome of a Gothic painting. Paint the nails a dark blue or burgundy base color. Employ a fine brush and metallic gold or silver polish, and paint pointed arch patterns of Gothic cathedral window design. Complete the gaps between the windows with a slightly lighter shade than your base. Allow it to dry, then paint tiny black bats flying over or through the windows. The metallic lines look divine in the light, and the bats bring on the Halloween mood. This is best for longer nails, where there is enough room to get into details. look at this…
9. Watercolor Bats

Create a watercolor, painterly effect using watercolor-type bat designs. Begin with a white or a very light gray base coat. With thin black polish thinned a little with clear polish, use a fan brush or a regular nail brush with spread-out bristles to paint soft, diffused bat shapes. This should be dreamy and not solid. Do lots of washes for the depth’s sake, letting each dry before applying the next. Include some sharp black bat silhouettes amidst the watercolor ones for contrast. This method produces a dreamy, gallery-quality finish that is chic but seasonally suitable. Cap it off with a glossy finish.
10. Glitter Gradient with Bat Accents
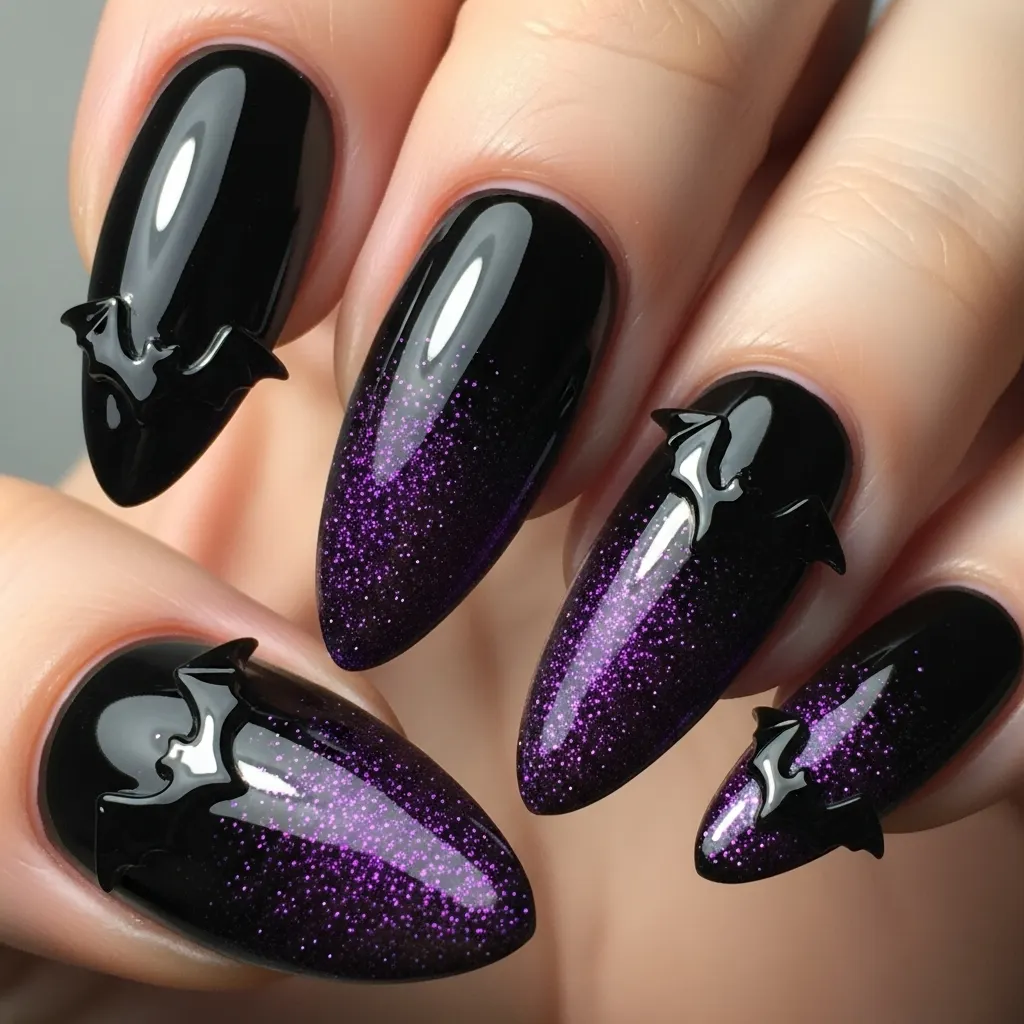
Put some added glitz into your spooktacular appearance with strategic placement of glitter. Coat all nails a black or dark purple base coat. Begin at the tips of the nails and paint on black or purple glitter polish, achieving a gradient effect by decreasing the glitter closer to the cuticle. When the glitter has dried thoroughly, use paint to create bat silhouettes on the opposite side of the nail from the cuticle with no glitter. The bats will stand in relief against the solid color, with the glitter providing depth and highlights. For contrast, matte black can be used for the bats against a glitter background. Varnish thin layers applied over and over again smooth out the texture.
11. Glow-in-the-Dark Bat Features
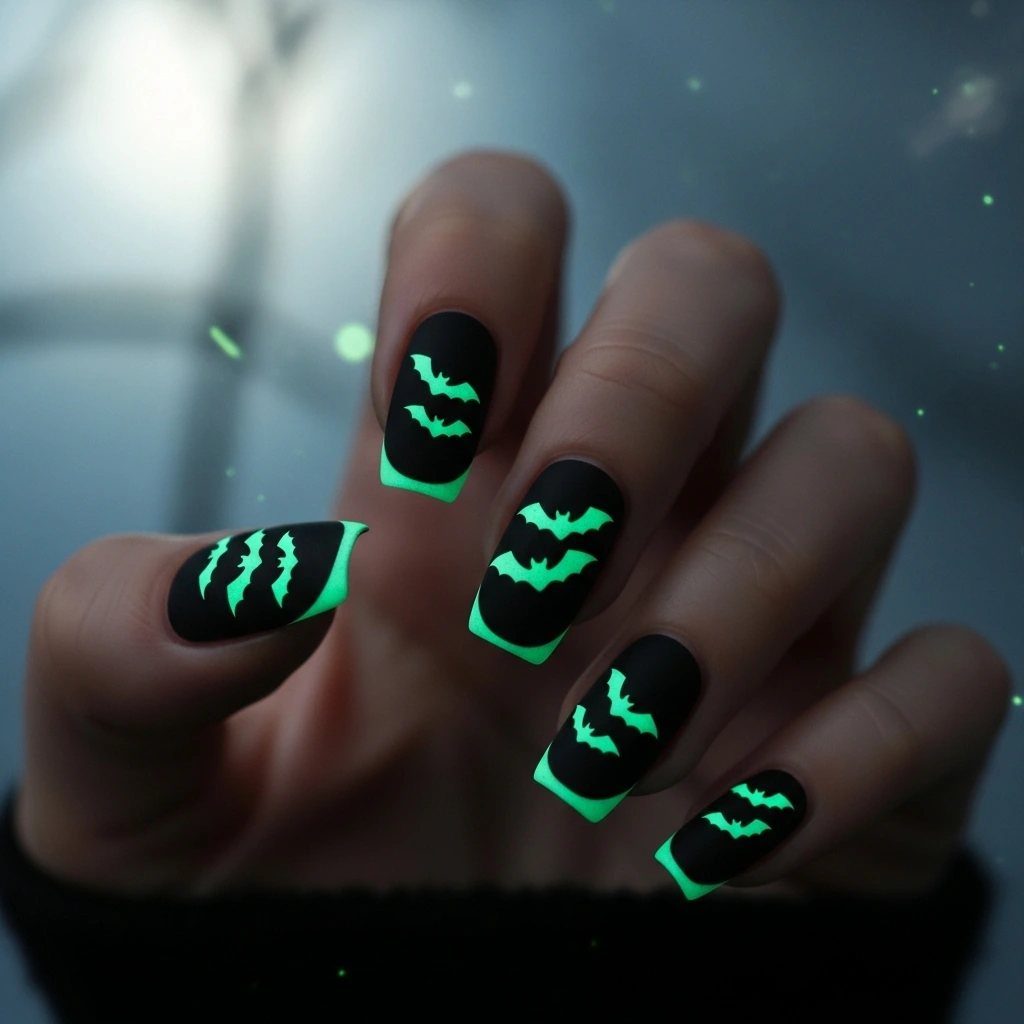
Make glow-in-the-dark nail art that glows in the dark. Apply a dark purple or black polish to your nails. Apply bat silhouettes in an area over your nails with glow-in-the-dark polish, which comes in white, green, or blue. Under normal lighting, the bats will be white or light-colored against the black background. At night, they will glow. For added effect, include glow-in-the-dark details such as eyes or sections of the moon. Try the glow effect in a black light or dark room. This nail art is perfect for Halloween parties with flickering lights. Paint several layers of glow polish to maximize the effect.
12. Bat and Spider Web Combination
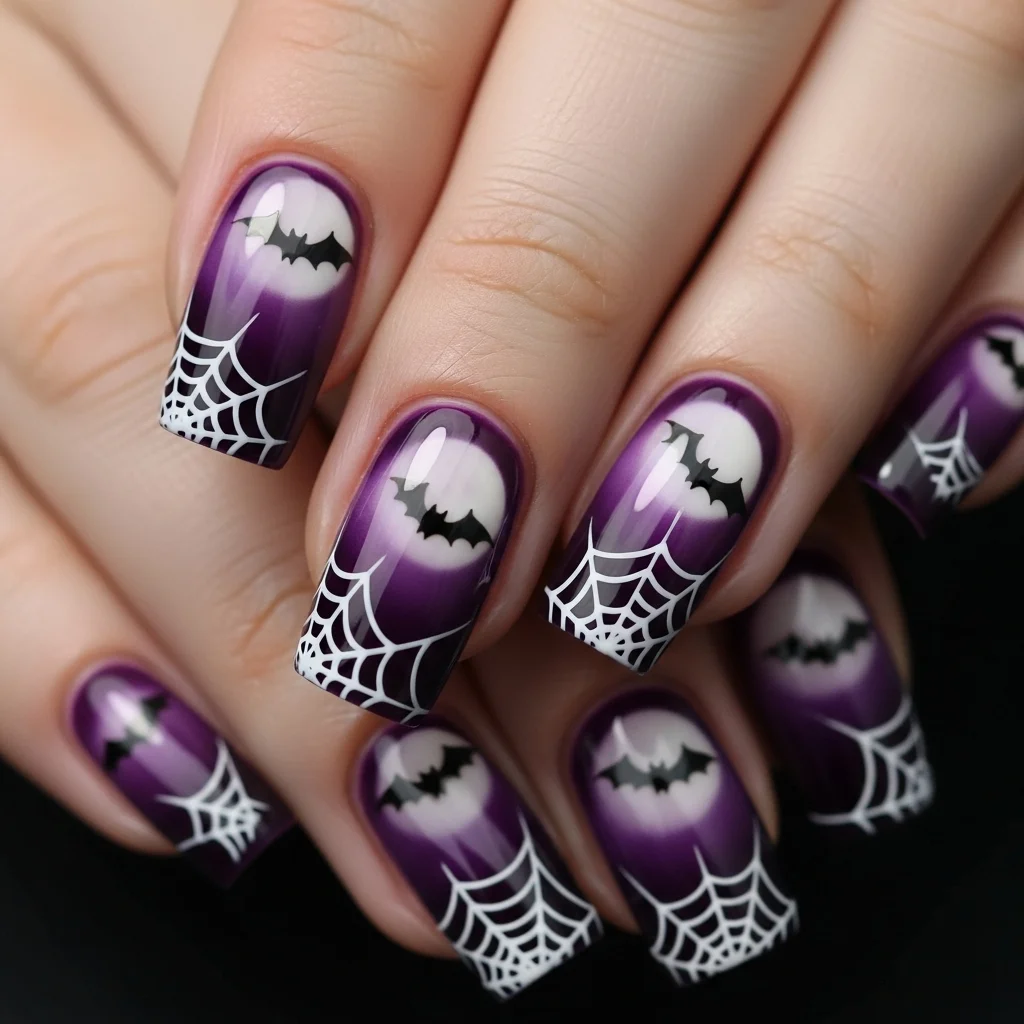
Combine two classic Halloween themes for maximum frightful effect. Paint your nails with a gray, purple, or black as a base to start painting. Apply white or silver polish with a fine striping brush to the nails in spider web patterns beginning at a corner of each nail, the lines extending outwards and meeting in curved areas. Allow webs to dry before adding black bat silhouettes flying into or through the web design. The bats may become entangled in the webs or fly by. Arrange pieces carefully so neither design overpowers the other. A shiny topcoat gives luster to the white webs on dark surfaces.
13. Easy Single Bat Accent
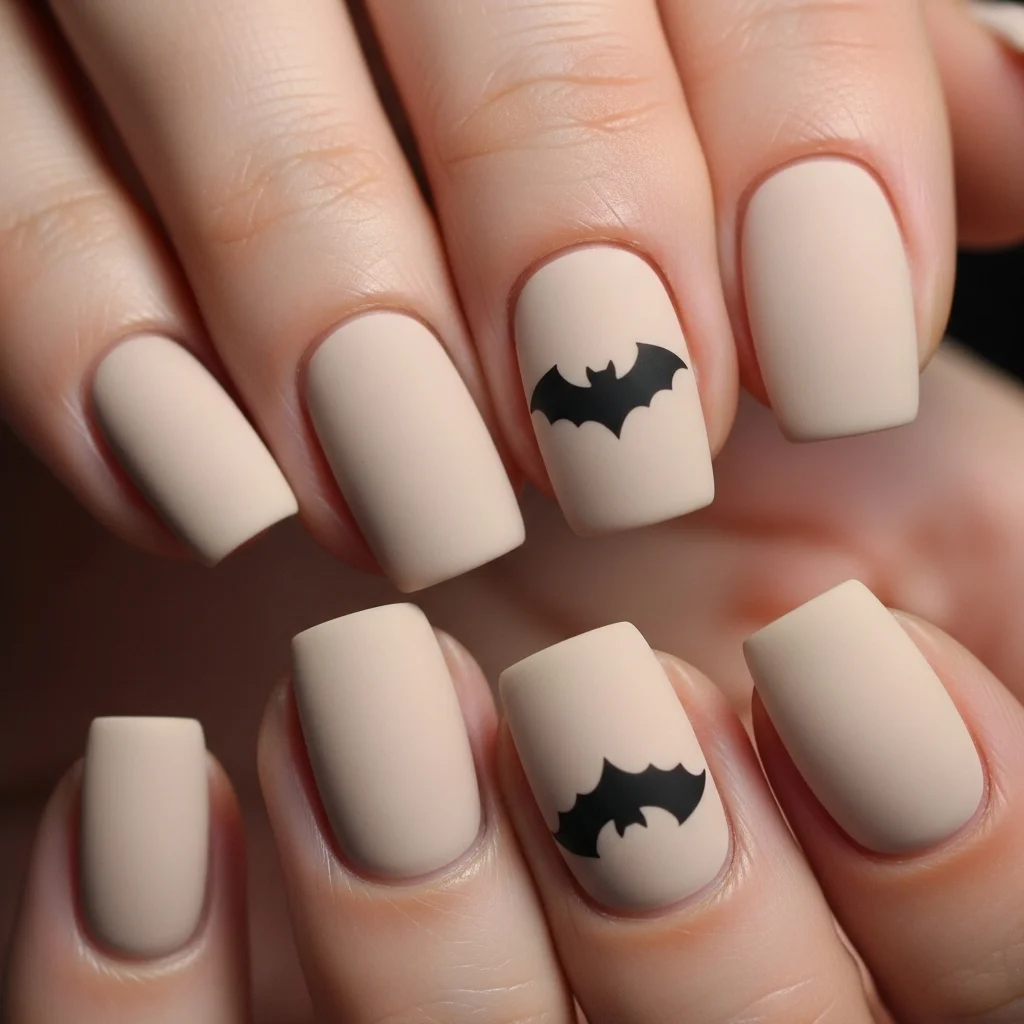
For all who like to keep Halloween style subtle, this clean design is gorgeous. Paint all the nails a sleek neutral shade such as nude, pale gray, or dusty rose. On one or two accent nails (mine are ring finger and thumb), apply a small black silhouette of a bat positioned coolly to the side of the cuticle or off to the side. The restraint provides the bat image with a chic instead of a costume appearance. The appearance is just as doable for casual wear as it is for Halloween gatherings. Superb execution is everything with simple images, so take a little time to create neat, sharp bat shapes. Cap it off with a matte top coat for a grimy, cool look.
14. Chrome Finish with Bat Outlines
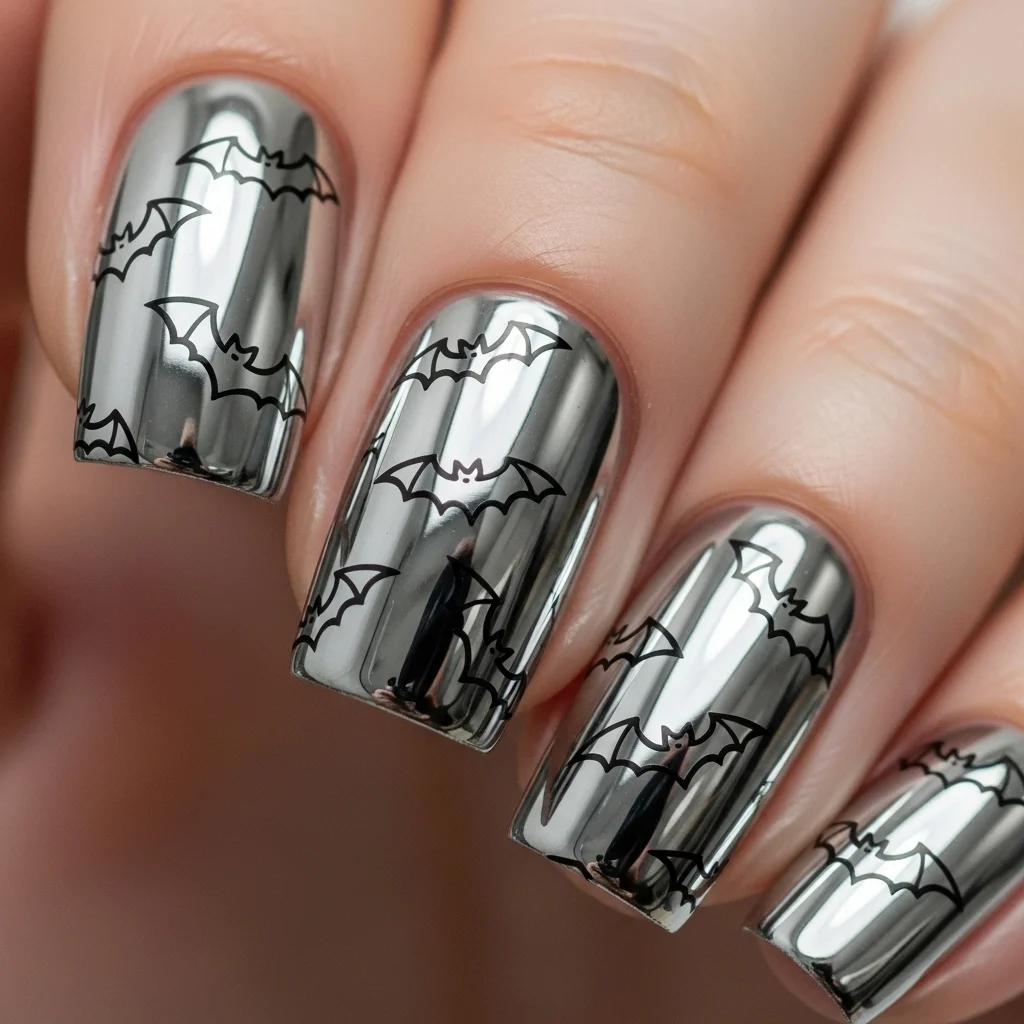
Go big with gothic futurism in metal chrome backgrounds and bat artwork. Top it off with a black base coat, followed by chrome powder or chrome polish (silver, purple, or even oil-slick multicolor) for a highly reflective finish. Having embedded in a gel top coat or top coat, paint bat shapes using a black polish and a fine brush. Leave the bats as lines so that the chrome can be seen through them. This gives an incredible stained-glass effect when the bats are outlined but not filled. The chrome catches the light beautifully and the black lines give definition and contrast.
15. Bats and Blood Drip Horror Scene
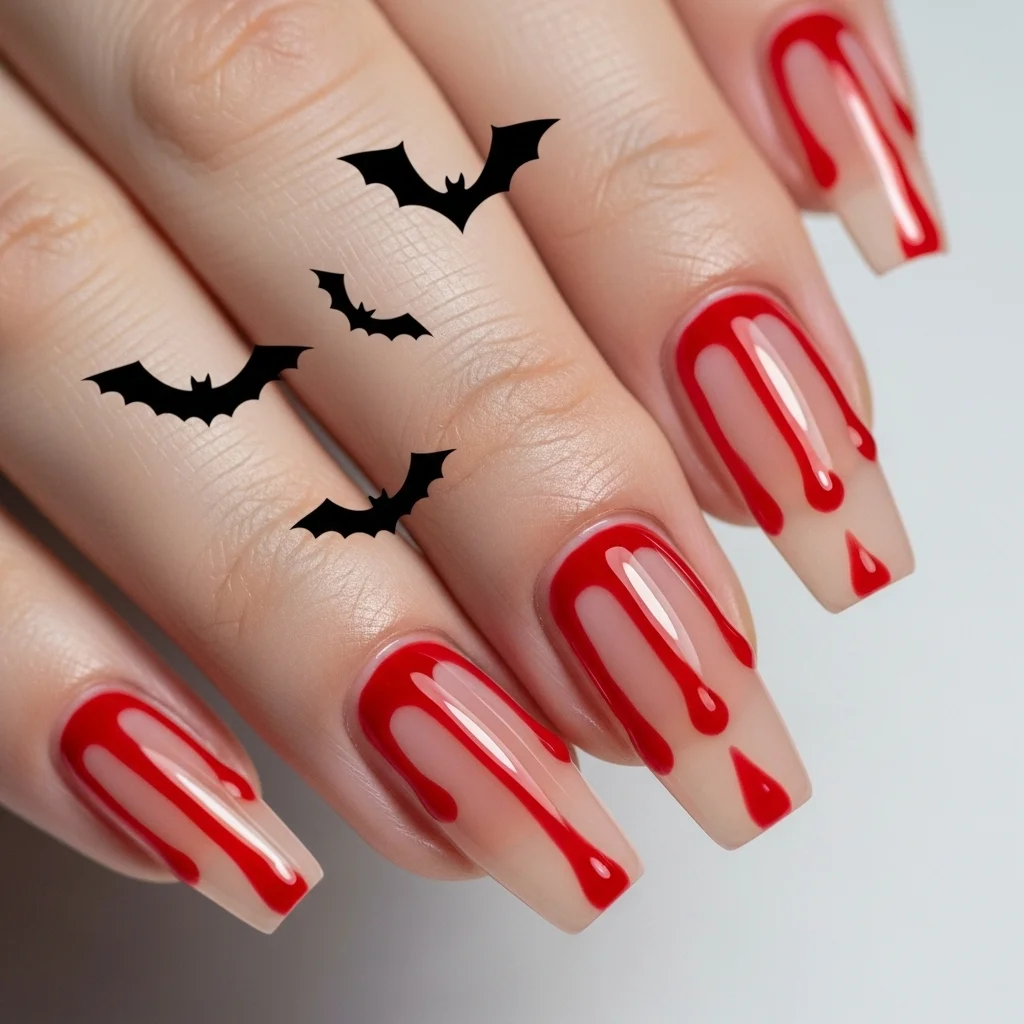
For the most dramatic Halloween appearance, use blood drip effects in combination with bat imagery. Apply a nude, white, or light gray base coat to replicate skin color. Use a bright red polish and a fine brush to paint the drip effects from the cuticle zone or tips of the nails, with uneven drips of varied lengths. Once the red is dried, add miniature black bat silhouettes flying near or passing through the blood drops. This design is extremely gruesome and horror-themed, making it ideal for Halloween parties or horror movie fans. The visual tension comes from the terrifying combination of innocent bats with horror-movie-type blood drops. Complete the entire thing with a thick glossy top coat to get the wet-look effect that makes the blood look more realistic.
Essential Tips for Perfect Bat Nails
Bat nail art success depends on good preparation and technique. Begin with clean, shaped nails and use a good base coat to help your own nails as well as allow polish to adhere. Spend money on good detail brushes that are meant for nail art—it really makes it that much easier to get small bat shapes. To do fine detail work while painting designs, hold the hand on a firm surface and grasp with the little finger for stability. Let one layer harden thoroughly before adding the next so that it doesn’t smudge. When you inevitably do make a mistake, use a small brush soaked in acetone or polish remover to wipe off smudges when the polish is fresh. Practice silhouettes of bats on paper or a practice wheel before trying to do them on your nails. Lastly, top it all off with a good quality top coat to extend wear and add extra protective shine.
These fifteen gothic bat nail art tips have a little something for every skill level and personal preference, from elegant simplicity to over-the-top Halloween extravaganza. With the proper tools, patience, and practice, it is possible to create professional-level bat nails with the perfect spooky-chic proportion.