The festive season presents numerous chances to let your festive cheer shine, and what better medium than your fingertips? Christmas nail art has moved from basic red and green to elaborate pieces of work that reflect the magic of Christmas. Whether you are getting ready for office celebrations, family get-togethers, or you want to spread holiday joy, the correct nail art can make your festive outfit complete and give you a boost of confidence through December.
Table of Contents
1. Classic Candy Cane Stripes
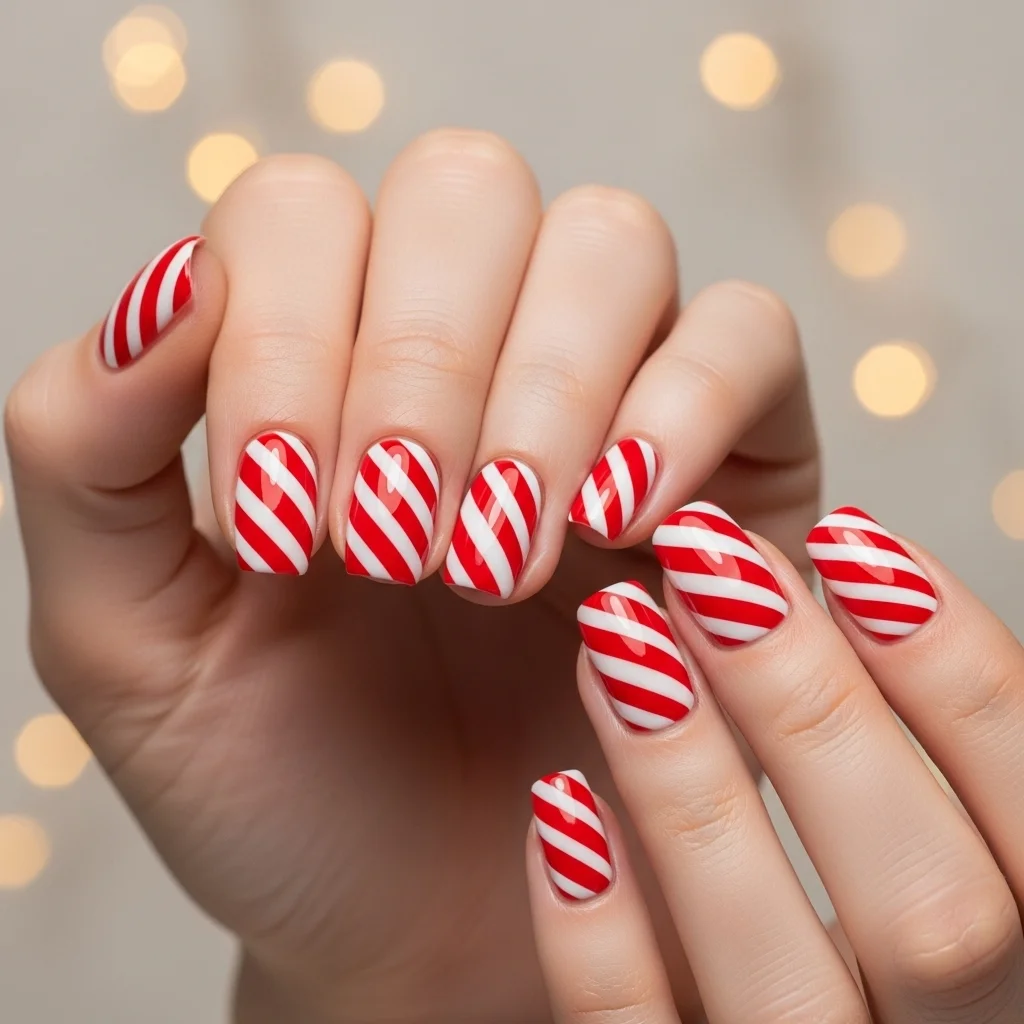
Nothing says Christmas more than classic red and white candy cane striping. This old-school look is fantastic on any nail length and, surprisingly, remains relatively easy to accomplish. Start with a base coat of white on each of the nails and allow it to dry. Using striping tape or a small paintbrush, paint diagonal red stripes on each nail. For a contemporary spin, reverse the direction of the stripes on every finger or introduce a bit of silver glitter at the edges. Patience is the secret to successful stripes—wait for one coat to dry completely before applying the next. This avoids smudginess and delivers sharp, clean lines that remain till the holiday season ends.
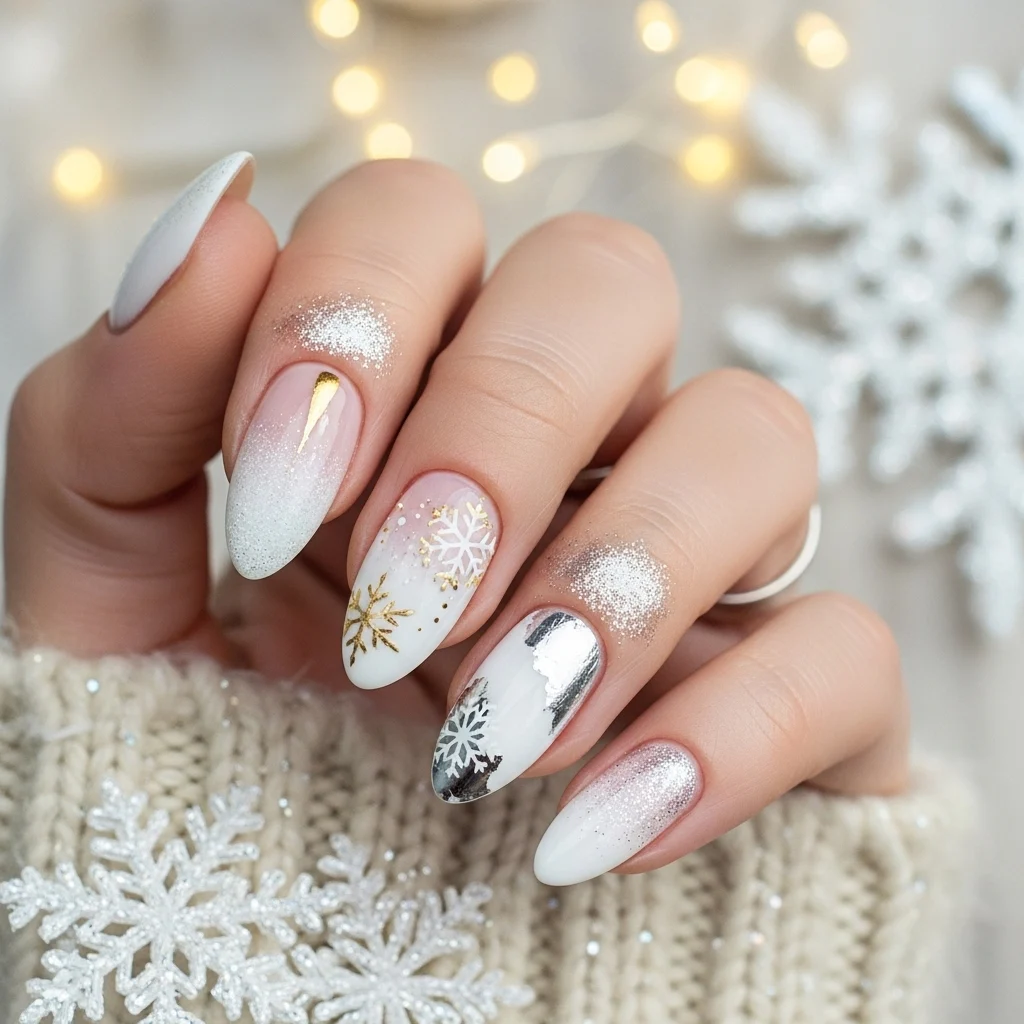
2. Shimmering Snowflakes
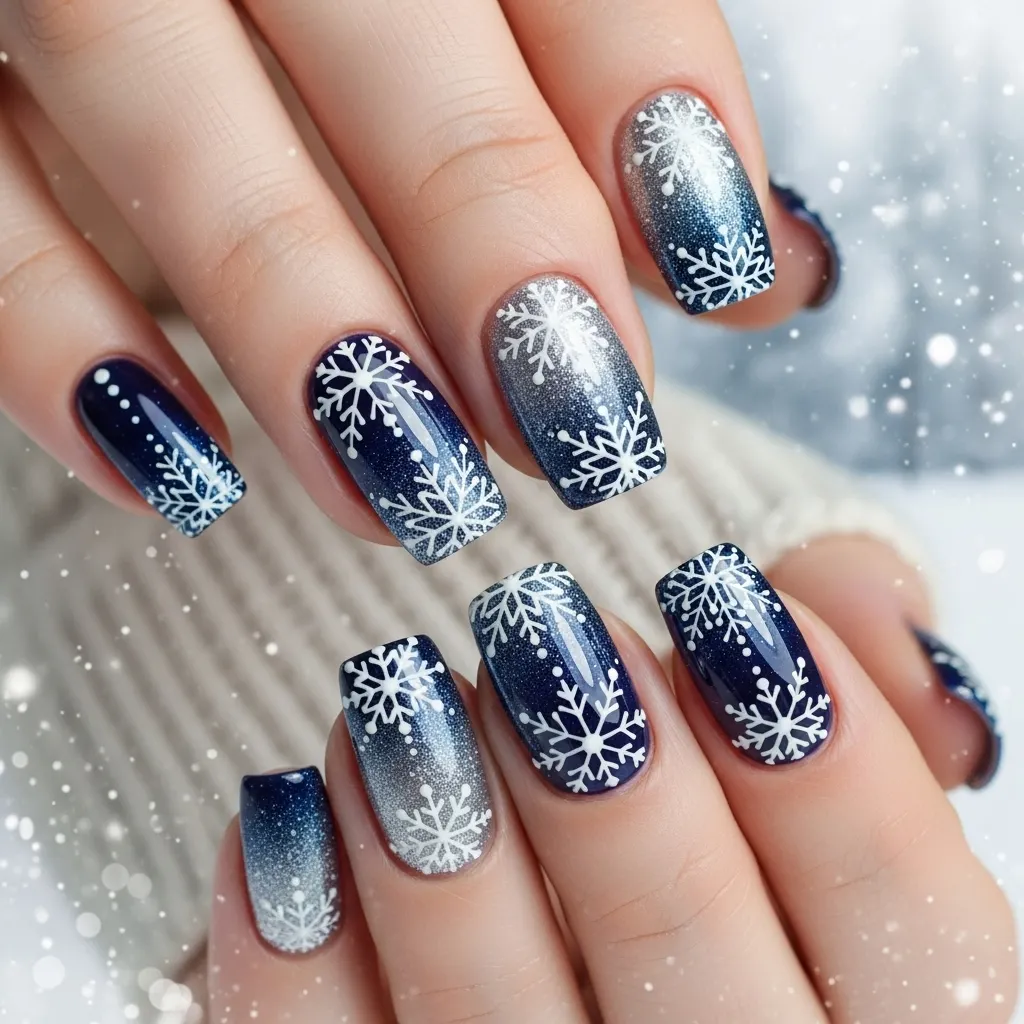
Snowflake motifs capture winter’s fragile beauty and adapt beautifully to the shape of any nail. Begin with a dark navy, silver, or light blue base to make your snowflakes truly stand out. It’s simple to create snowflakes out of white polish, and with the use of a dotting tool, starting out with a small plus sign and filling in the diagonal lines between the arms. If you’re not very skilled at freehanding, snowflake nail stickers are a guaranteed alternative that is equally lovely. Seal everything in place with a good top coat, and consider placing small rhinestones in the centers of snowflakes for added glamour. This look is especially fabulous on accent nails, where you can offset flashy snowflakes with simpler, less intricate complementary colors on other fingers.
3. Holiday French Tips with a Twist
The classic French manicure receives a holiday makeover with Christmas-themed iterations that are sophisticated and playful. Swap the traditional white tips for metallic gold, sparkly red, or even green with tiny gold stars. Another old-fashioned notion is to obtain the gradient look where the tip tapers from dark red to gold, as the lights of Christmas illuminate. For a more discreet option, retain the white tip but maintain a slim line of red or gold just beneath. This new French tip shape is suitable for work environments but still retains its festive tone, making it perfect for individuals who want to achieve festive nails without going overboard. Let’s dive into…
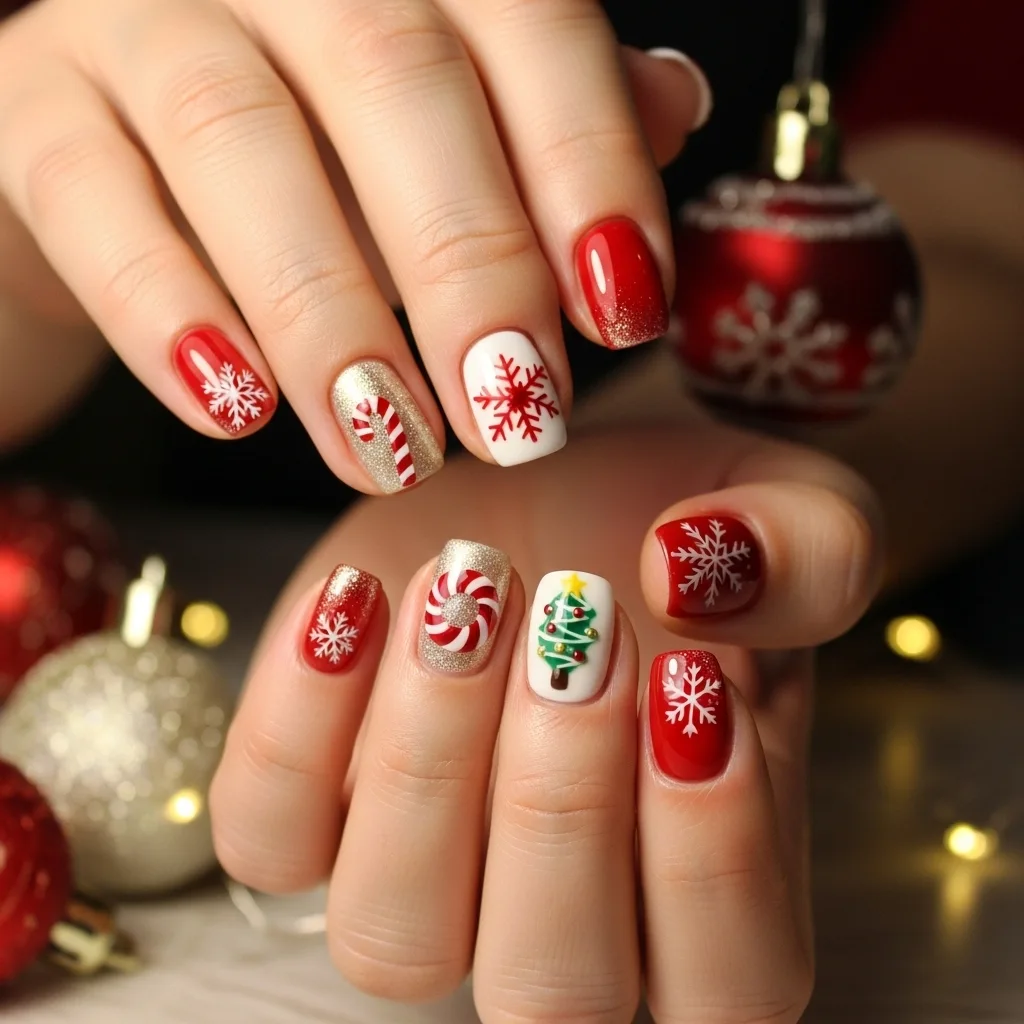
4. Sweet Santa and Reindeer Characters

Character nails bring a dash of playfulness and personality to your holiday nail look. Creating recognizable characters requires less artistic skill than you think. For Santa, apply a red base over one or two accent nails, add a black belt stripe through the center with a thin brush or striping tape, and finish with a small gold square buckle. Reindeer art is stunning on a tan or brown base—add two white spots for eyes, a red spot for Rudolph’s nose, and small brown stripes going up for antlers. The secret to good character nails is simplicity; you don’t need a photorealistic level of detail to create instantly recognizable holiday characters that put a smile on one’s face.
5. High-end Gold and Burgundy Combination
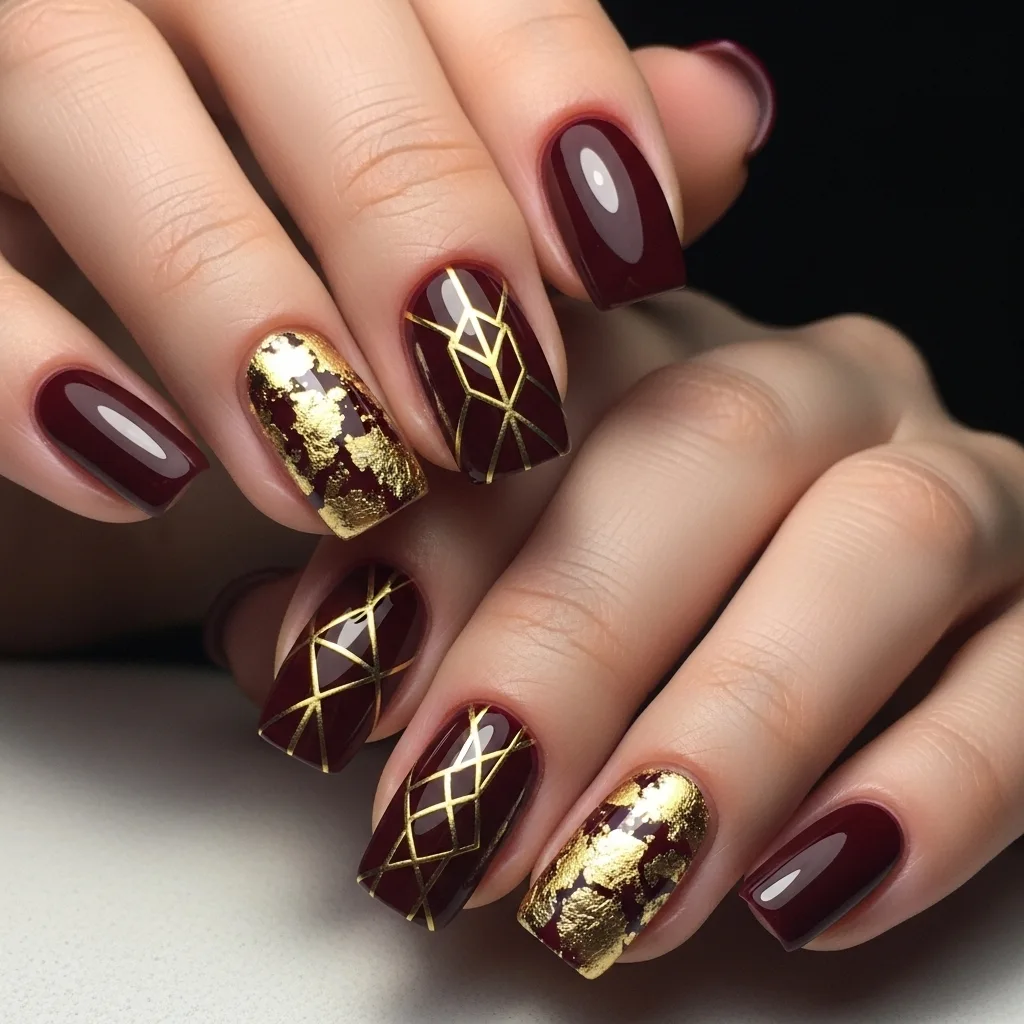
For the event where you prefer intricate-looking but refined holiday nails that transition flawlessly from office to party occasions, the gold and burgundy pairing offers timeless elegance. Burgundy can serve as a rich base color that suits most skin tones. Add strategically placed gold accents—fine gold lines creating geometric shapes, create one gold accent nail, or tiny gold foil pieces stamped into the burgundy background. This is a warm, inviting color combination reminiscent of candlelit holiday evenings without losing elegance. Paint thin coats of polish to achieve the richest burgundy color without heavy, uneven coverage and finish with a glossy top that calls out the jewel-like luster.
6. Ombre Glitter Magic
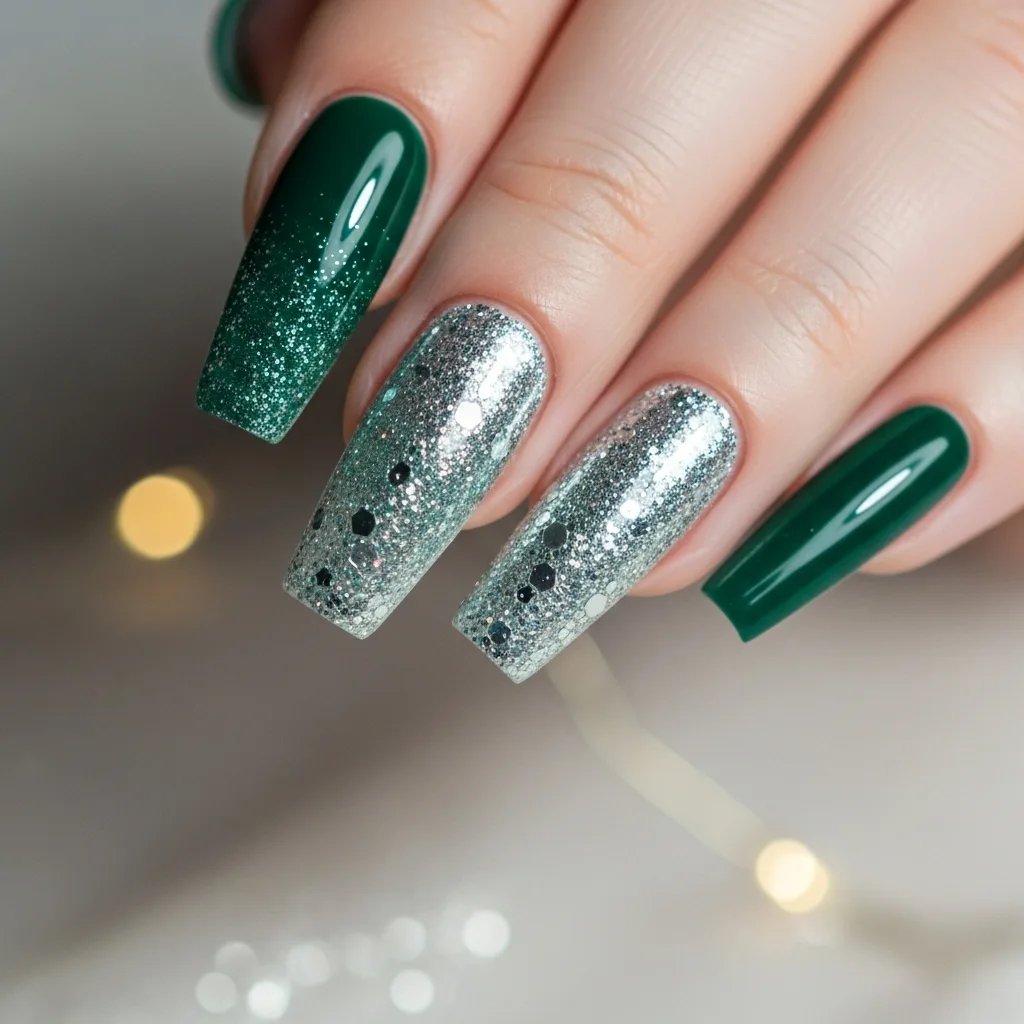
Ombre nail art produces a stunning gradient effect that catches the attention without requiring special talent. For Christmas, try from dark forest green at the cuticles to sparkly silver at the tips, or from classic red to gold glitter. The sponge technique makes ombre simple for newbies—apply your two desired colors to a makeup sponge in a gradient and then lightly dab onto every nail. Build up the color gradually with multiple coats, allowing each layer to dry slightly between dabs. This produces a gentle, soft-edged appearance that looks professional. Flatten any texture produced by sealing with a top coat and fix that lovely sparkle.
7. Simple Christmas Trees
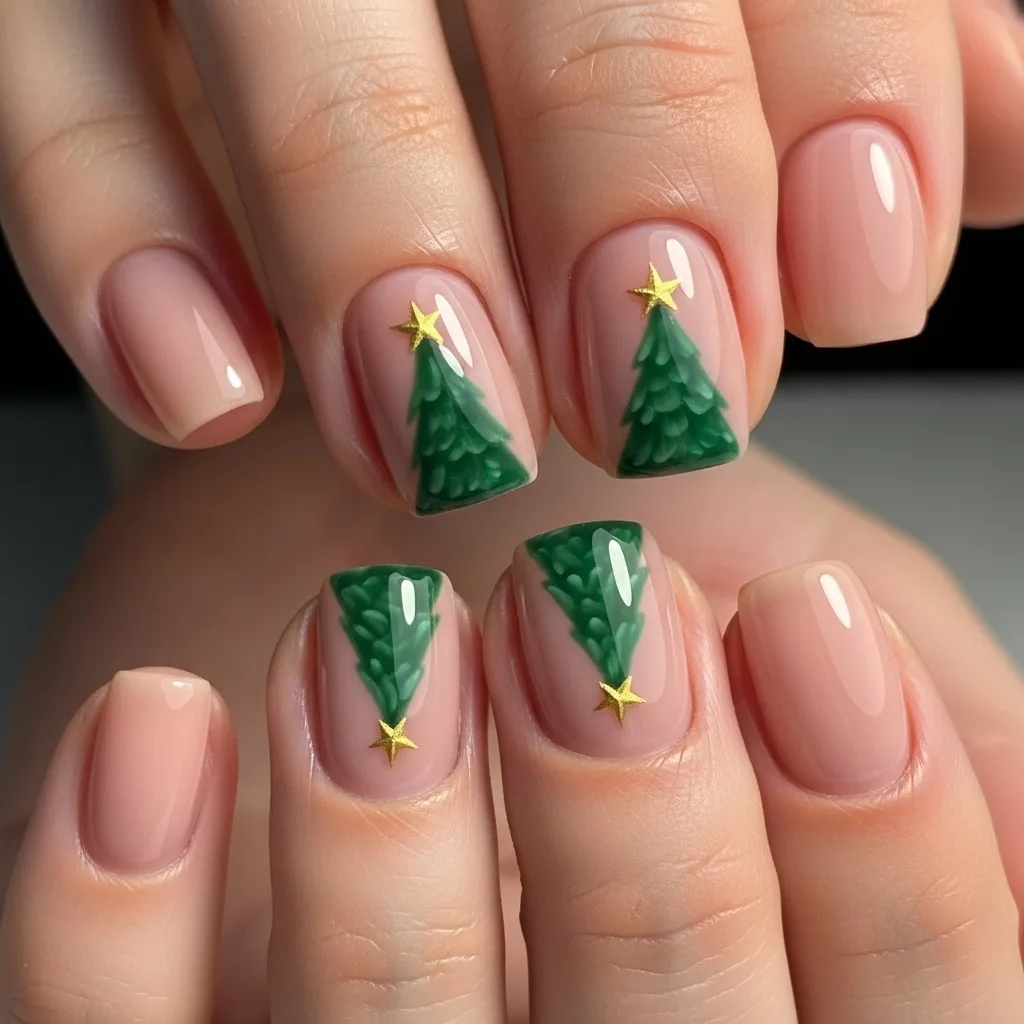
Sometimes less is more, and simple Christmas tree designs show that beautifully. On a plain white, pale pink, or bare ground, paint simple triangular tree shapes with a striper or thin brush in deep emerald or forest green. Add a small gold star at the top of each tree and perhaps a few small dots down the tree for decorations. This understated approach is great for people who prefer less overt holiday allusions than grand declarations. The elegant tree design also allows you to add holiday details on one or two accent nails and leave other nails in plain coordinating colors, creating a cohesive, modern appearance that won’t overwhelm your overall style.
8. Plaid Perfection
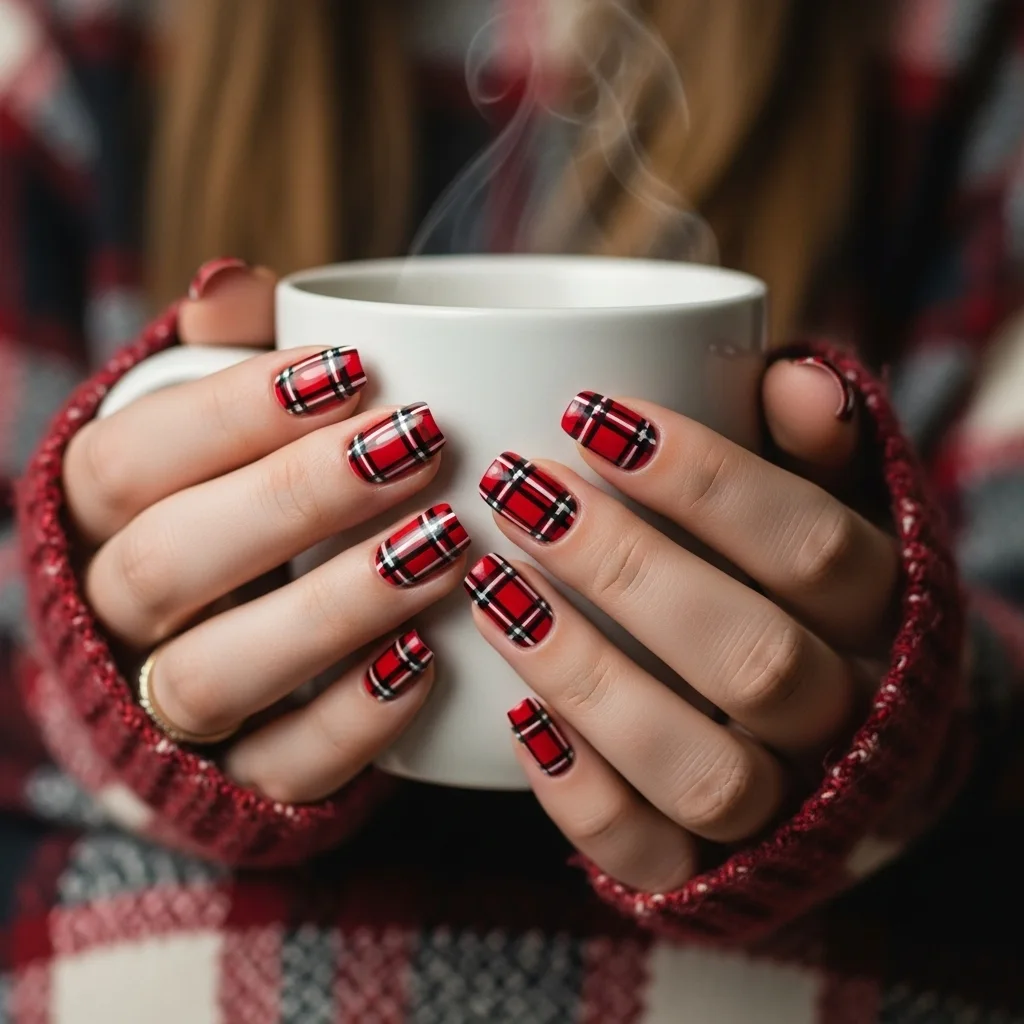
Plaid patterns bring to mind cozy holiday recollections of flannel pajamas, wrapped presents, and blazing firesides. While plaid might appear to be complex, breaking it into steps makes it simple. Start with an anchor color—traditional red, green, or even white is good. Let it dry, and then paint horizontal and vertical lines in a second color with a fine brush, creating a gridlike effect. Paint a second set of lines in another color, off the first grid. The subtle, human flaws actually add character to plaid nails, so don’t feel so bad about not achieving machine-perfect precision. This is a wonderful trend for short nails when the complete plaid design is visible and readable.
9. Twinkling Lights Design
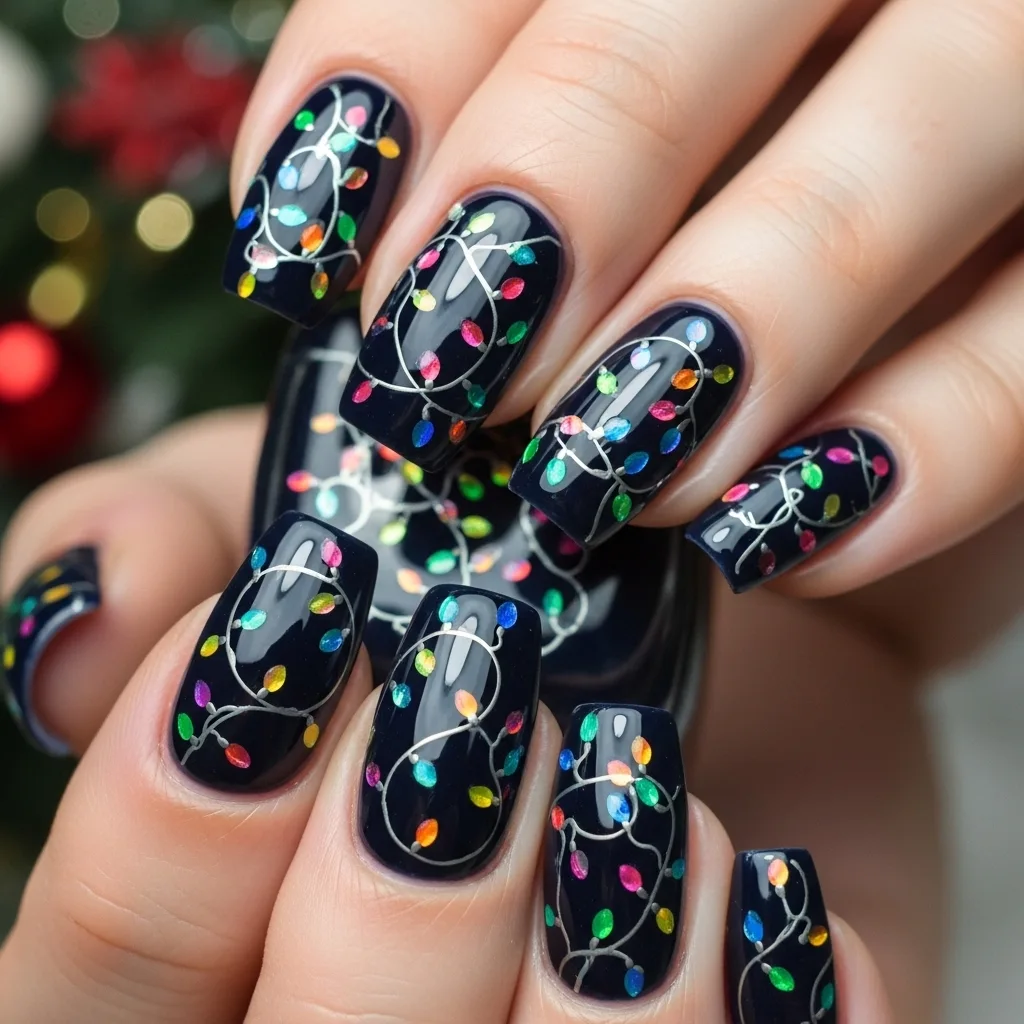
Christmas lights illuminate neighborhoods with a cheerful glow each December, and you can give your nails an identical whimsical luster. Use a dark base coat—navy blue, deep purple, or black to create a perfect evening sky. With various shades of bright polish colors (red, yellow, green, blue, orange), create small oval shapes scattered throughout each nail to represent individual bulbs. Connect them in a slender curved line in white or gold to replicate the wire strand. For depth, put a small white dot on one side of each colored bulb to create a highlight effect. This playful style simply indulges in the playfulness of holiday accents and is ideal for color fans not worried about extreme nail art.
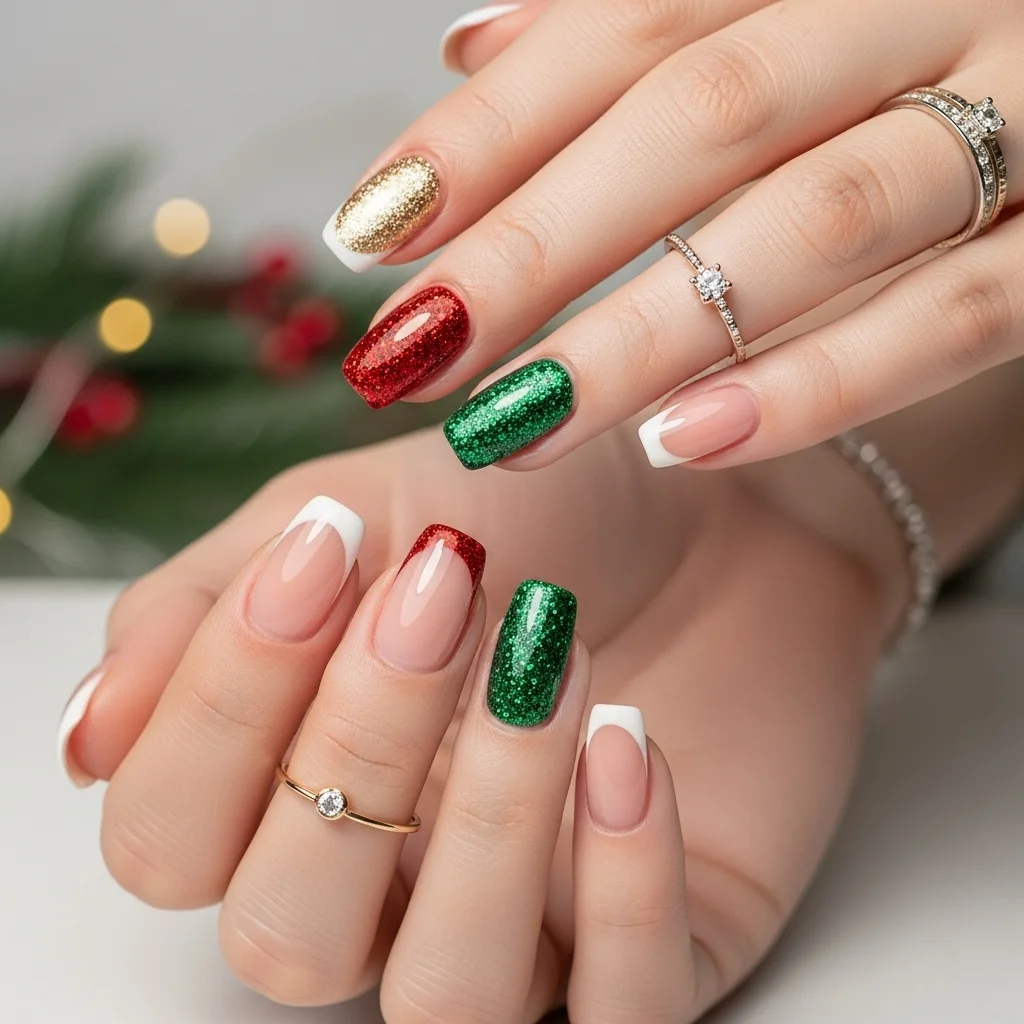
10. Mixed Metallic Wonderland
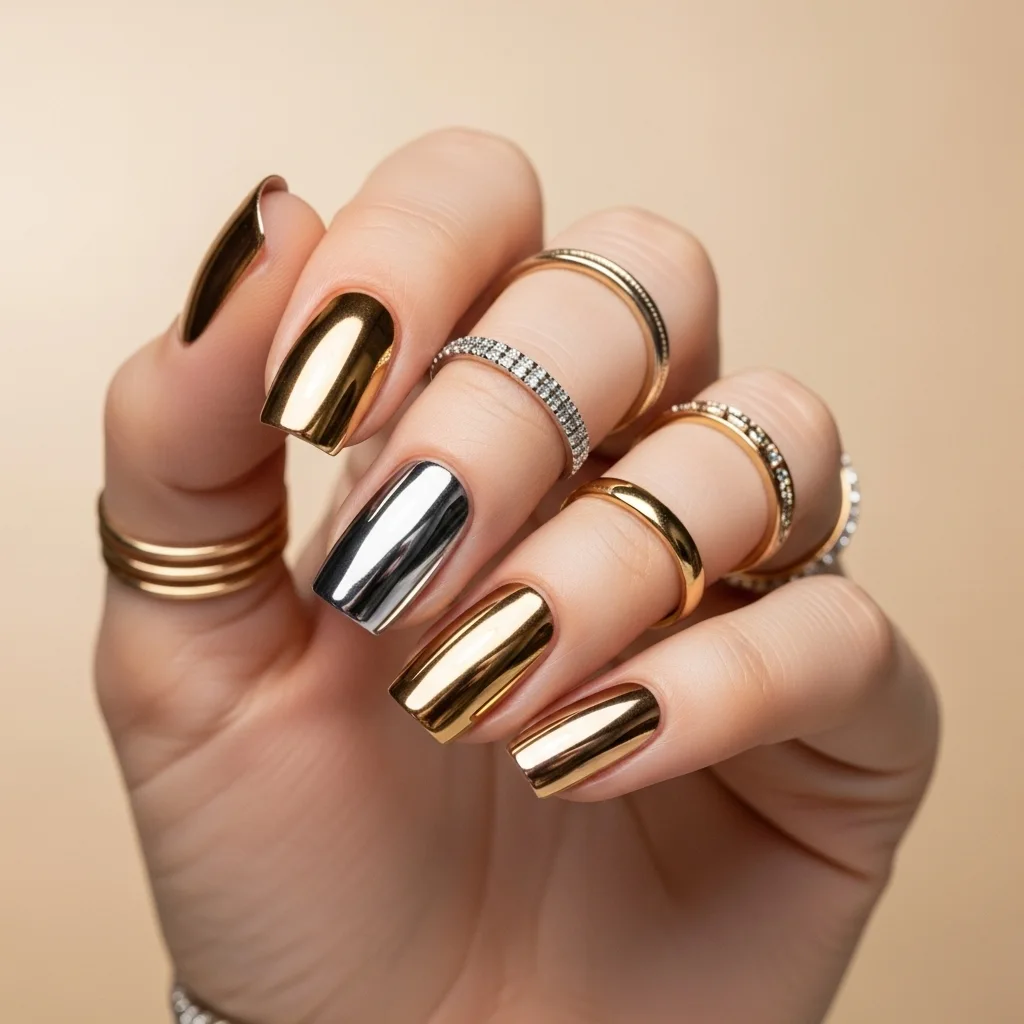
If you simply can’t choose just one celebratory detail, a mixed metallic approach lets you incorporate more than one Christmas symbol without appearing bewildered. Coat each of your nails with a distinct metallic shade—gold, silver, rose gold, copper, or bronze—creating a cohesive yet varied appearance. On these metal bases, topped with small festive details: a tiny white snowflake on gold, a red ball on silver, a green tree on rose gold. The metal bases keep the various designs down to earth, and the different symbols avoid monotony. This technique is suitable for individuals who like variety and would wish their manicure to convey multiple aspects of Christmas fashion. The reflective quality of metallics also photographs well, so these nails are perfect for all of your holiday parties and selfies.
Creating holiday nail art is not a task for professional salon professionals or expensive equipment. With basic polishes, minimal equipment, and patience, you can achieve long-term Christmas manicures that spread cheer from the first day of winter until the final day of the season. Remember that practice makes perfect, so do not anticipate your initial attempts to be perfect. The charm of doing nail art yourself is in the experience, and even simple designs spread holiday cheer wherever you are.